
How to Set Up Irrigation for a Square Foot Garden

Make watering your square foot garden easier with a practical guide to drip irrigation. Discover the equipment you need, how to install it and how to water raised beds efficiently.
This post may contain affiliate links. Please see the affiliate disclosure for details.

One of the nicest things about square foot gardening is seeing just how much you can grow in a small space. A few squares of lettuce, some climbing peas, colourful Swiss chard and a handful of carrots can make even a modest raised bed wonderfully productive.
But there’s one job that becomes a little trickier as everything starts growing: watering.
When your vegetable bed is full of leafy plants, getting water to the soil beneath them isn’t always easy. And during a warm, dry summer, those closely planted vegetables can need quite a bit of attention.
That’s where a simple irrigation system can help.
Instead of trying to reach between plants with a watering can, you can use drip irrigation or a seep hose to deliver water slowly around the roots. It doesn’t need to be complicated or expensive, either.
In this guide, we’ll cover the best watering systems for square foot gardens, what equipment you need, how to install a simple drip system, and how to ensure your vegetables get enough water without wasting it.
Do Square Foot Gardens Need an Irrigation System?
Not necessarily. If you have one small raised bed close to your house, a watering can may be all you need.
In fact, watering by hand gives you excellent control over how much water each plant receives.
However, an irrigation system becomes more useful when you have several beds, a particularly densely planted growing area or limited time to water during dry weather.
Square foot gardens use a grid to organise vegetables into small sections, usually measuring around 30 × 30cm.
Although the grid makes planting easier to plan, the squares don’t form separate root compartments. Roots spread through the soil, and the foliage of neighbouring plants may overlap as they mature.
This means watering the entire bed evenly can become more important than trying to give each individual square an identical amount of water. A well-designed irrigation system can make that easier.
Benefits of Irrigation in a Square Foot Garden
There are several reasons to consider installing irrigation, particularly in raised beds.
Water Reaches the Root Zone
Drip irrigation and seep hoses deliver water at or near soil level. This is especially useful once vegetable foliage begins covering much of the bed. Instead of watering over the leaves, you can direct moisture into the soil where the roots can absorb it.
Less Water May Be Wasted
A properly installed drip system can reduce unnecessary watering of paths and surrounding areas.
Because water is delivered slowly, it may also reduce runoff. However, irrigation isn’t automatically water-efficient. A poorly adjusted timer, leaking connector or blocked pipe can waste water or leave plants too dry.
Watering Becomes More Convenient
If you have several raised beds, a connected system can reduce the time you spend carrying watering cans between them. A suitable timer can also make watering more consistent.
However, you’ll still need to check your plants and adjust watering as the weather changes.
Soil Moisture Can Be More Consistent
Vegetables such as lettuce, celery, tomatoes and courgettes benefit from suitable, reasonably consistent soil moisture.
Long dry periods followed by sudden heavy watering can create problems for some crops. Properly managed irrigation can help avoid those extremes.
It’s Easier to Water Beneath Dense Foliage
Once leafy vegetables fill their squares, it can become difficult to see where water is landing. You can place drip lines before the plants mature, making watering easier throughout the season.
What’s the Best Irrigation System for a Square Foot Garden?
Several options exist, and the best choice depends on your garden’s size, available water supply, and how much control you want.
|
Watering method |
Best for |
Main consideration |
|---|---|---|
|
Watering can |
One or two small beds |
Simple and inexpensive, but needs your time |
|
Seep hose |
Closely planted rows or beds |
Waters along its length but offers less individual control |
|
Drip irrigation |
Several beds or mixed vegetable plantings |
Controlled delivery, but requires suitable components |
|
Automatic drip system |
Regular watering across multiple beds |
Convenient, but timers and emitters still need checking |
|
Rainwater-fed irrigation |
Gardeners wanting to reduce mains water use |
Needs adequate storage and suitable flow or pumping |
Drip Irrigation
Drip irrigation uses tubing fitted with small outlets called emitters or drippers. These release water slowly near the plant roots.
Some drip lines come with emitters already built in at regular intervals. Others let you position individual emitters where plants are growing.
This makes drip irrigation particularly useful for vegetable beds with different planting arrangements.
Seep Hoses
A seep hose, sometimes called a porous or leaky hose, releases water gradually along its length.
It’s relatively simple to lay around vegetable beds and can be particularly useful where plants are closely spaced. Covering the hose with a suitable mulch can help reduce evaporation.
However, seep hoses don’t offer the same control over individual watering points as systems with separate emitters.
Hand Watering
Don’t overlook a watering can. If your square foot garden is small, watering by hand may be the cheapest and simplest solution.
It also encourages you to check your plants regularly. An irrigation system is a convenience, not an essential requirement for successful square foot gardening.
What You’ll Need for a Simple Drip Irrigation System
For a small raised bed, a basic drip irrigation kit is usually the easiest place to start. Depending on the kit, you may need:
- A suitable length of irrigation tubing or drip line
- Drip emitters, if they aren’t already built into the tubing
- Compatible connectors and elbows
- End caps or removable end fittings
- A filter suitable for the system
- A pressure regulator where required
- Suitable connectors for your water source
- Pegs or clips to hold the tubing in position
- An optional irrigation timer
You may also need appropriate backflow protection if the system connects to your mains water supply. Choose components designed to work together.
I wouldn’t recommend making random holes in an ordinary garden hose. Water flow can become uneven, and it may be difficult to prevent leaks or blocked holes. Purpose-made irrigation tubing and emitters offer a more dependable solution.
How to Set Up Drip Irrigation in a Square Foot Garden
Let’s look at the installation process using a typical raised bed. You can adapt the same approach for larger beds or several growing areas.
Step 1: Measure Your Growing Bed
Start by measuring your square foot garden. For example, a standard four-by-four square foot bed measures approximately 1.2 × 1.2 metres.
Think about where the water will enter the bed and how the tubing can reach the plants. You don’t need a separate dripper in every square. The key is getting water to the root zones of the crops you’re growing.
Step 2: Look at Your Planting Plan
Before laying any tubing, decide what you’ll be growing. A bed of closely spaced salad leaves may benefit from drip lines running through several sections.
A bed containing a few large tomato or courgette plants may be better suited to individual drippers.
Also consider which crops need regular watering. Lettuce and celery, for example, generally appreciate consistent moisture, while some established herbs prefer drier soil.
If possible, group plants with similar watering requirements. This makes the system easier to manage.
Step 3: Choose Your Water Source
Your system might connect to an outside tap or, with suitable equipment, a rainwater storage tank.
If you’re using mains water, check that the tap and irrigation installation have appropriate backflow protection. UK requirements vary with the type of connection and the level of contamination risk.
A permanent automated mains-fed irrigation installation may need additional protection beyond a simple garden tap fitting. If you’re unsure, ask your water supplier or a suitably qualified plumber before installing a permanent system.
If you’re using a water butt, check whether the irrigation equipment can operate at the available pressure. Many standard drip systems need more pressure than a gravity-fed water butt can provide. A suitable low-pressure system or pump may be necessary.
Step 4: Lay Out the Tubing
Position the tubing on the soil surface before securing it. For a square-foot garden containing many small vegetables, parallel drip lines can be a practical arrangement.
For individual larger crops, position emitters near their root zones. Avoid placing all the water outlets against the stems.
Aim to moisten the surrounding root area rather than keeping the base of each plant constantly saturated. Use irrigation pegs to hold the tubing in place. Avoid creating sharp bends that restrict flow.
Step 5: Connect the Emitters
If your drip line already contains emitters, you may only need to connect the tubing and secure the ends. If you’re using separate emitters, fit them according to the manufacturer’s instructions.
Use the correct installation tool rather than puncturing tubing with a needle. Check the output rating of your emitters.
For example, a dripper rated at two litres per hour should release approximately two litres over an hour under the specified operating conditions. However, that doesn’t mean every plant needs two litres each hour.
The right amount depends on the crop, soil, weather and how much moisture is already present.
Step 6: Fit the Filter and Pressure Regulator
Many drip irrigation systems require filtration to stop debris from blocking the small water passages. A pressure regulator may also be needed to keep the water pressure within the range recommended for the tubing and emitters.
Follow the instructions provided with your particular system. Don’t assume that higher water pressure always means better irrigation. Too much pressure can damage fittings or cause uneven delivery.
Step 7: Flush and Test the System
Before closing the ends of the irrigation lines, flush them as directed by the manufacturer to remove any debris. Then secure the end fittings and turn on the water. Check that:
- Water is reaching the intended areas.
- Emitters are releasing water as expected.
- No connectors are leaking.
- The tubing isn’t kinked.
- The far end of the system receives adequate flow.
Run the system long enough to see how the soil becomes moist around the drippers.
Step 8: Check How Deeply the Water Reaches
This is one of the most important steps. A patch of damp soil on the surface doesn’t necessarily mean the roots have received enough water.
After a test run, gently check the soil several centimetres below the surface. For deeper-rooted crops, check further down into the root zone. If only the very top layer is damp, the system may need to run longer.
If the soil is waterlogged or water is running out of the bed, reduce the amount applied or adjust the watering schedule. The aim is thorough, appropriate watering rather than keeping the soil constantly wet.
Step 9: Add a Timer if You Need One
A timer can make watering easier, especially during summer. However, there’s no perfect schedule that works for every garden.
Start with a modest setting based on the system’s output, then check the soil and adjust. Watering needs will change depending on rainfall, temperature, wind, soil type and crop growth. A timer should help you manage watering, not replace checking your garden.
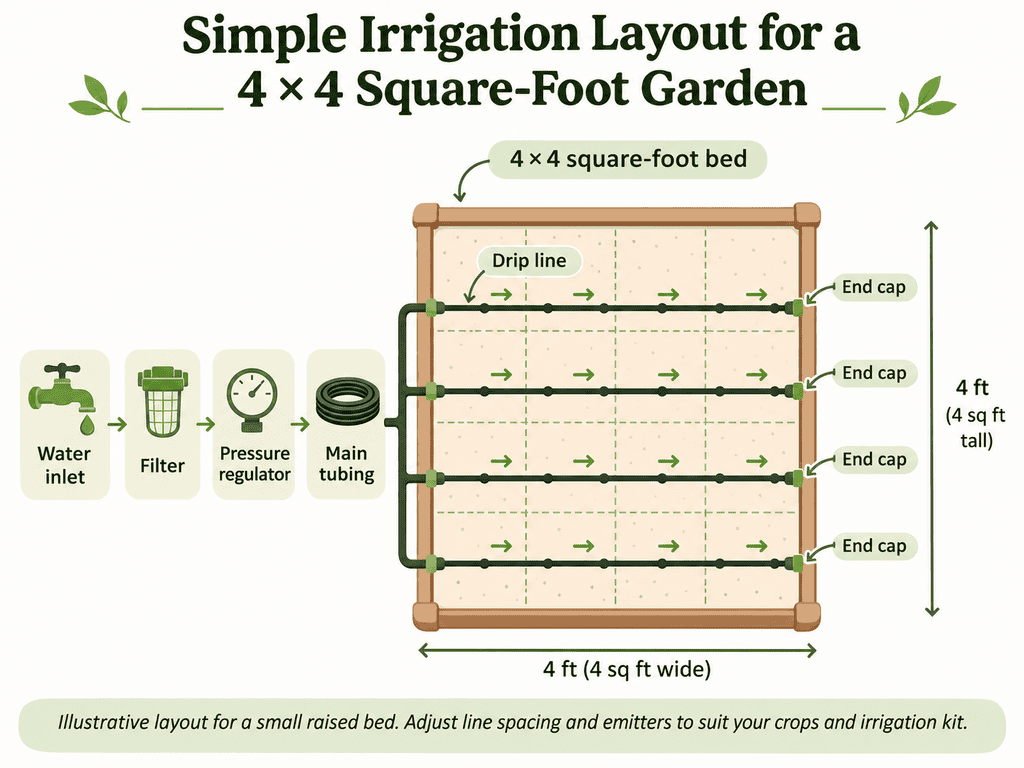
Example Irrigation Layout for a 4 × 4 Square Foot Garden
Imagine a raised bed divided into sixteen squares. You might have:
|
North edge |
|||
|---|---|---|---|
|
Peas |
Peas |
Spring onions |
Spring onions |
|
Lettuce |
Lettuce |
Spinach |
Spinach |
|
Beetroot |
Beetroot |
Radishes |
Radishes |
|
Carrots |
Carrots |
Lettuce |
Lettuce |
For this type of closely planted bed, several parallel drip lines running across the soil may work well. Choose the number and spacing of lines according to the manufacturer’s recommended wetting coverage and your soil type.
You don’t need to install exactly sixteen drippers simply because there are sixteen squares. The garden grid is a planting guide, not a map of sixteen separate watering compartments.
If you later replace several squares with a large courgette or tomato plant, you may need to move or adjust emitters to suit the new root area. This flexibility is one advantage of a system you can adapt over time.
How Long Should You Run Drip Irrigation?
This is one of the first questions gardeners ask, but there isn’t a single answer. Different drip systems release different amounts of water.
For example, four emitters rated at two litres per hour each would theoretically release eight litres during one hour of operation at their rated output.
But the length of time needed to water a bed depends on how that water spreads through the soil and how much the plants need.
Sandy soil drains quickly, while heavier soils may hold moisture for longer.
New seedlings also have different needs from established, mature vegetables.
Rather than copying a fixed schedule, run the system, check the moisture beneath the surface and adjust accordingly.
Early morning is usually the best time for routine watering because less water is lost to evaporation. However, if plants are genuinely suffering from drought during the day, don’t delay essential watering simply because the sun is shining.
Water droplets don’t normally magnify sunlight enough to scorch leaves, despite this common gardening myth.
Can You Use Irrigation During a UK Hosepipe Ban?
This is an important consideration for UK gardeners. A drip irrigation system is not automatically exempt from a temporary hosepipe or water-use ban.
The rules depend on your water supplier, the restriction in force and the design of the system.
Some suppliers may permit particular drip or trickle systems under specified conditions, while others impose different restrictions.
Before operating a mains-fed irrigation system during a restriction, check the latest guidance from your local water company. Stored rainwater used appropriately may provide an alternative.
Watering cans are also generally permitted during ordinary domestic hosepipe restrictions.
Since these rules can change, it’s worth checking them each summer rather than assuming the same exemptions always apply.
Can You Connect Drip Irrigation to a Water Butt?
Yes, but you’ll need equipment suited to the available pressure and water supply. Ordinary water butts often provide relatively low water pressure, especially as the water level falls.
Some gravity-fed irrigation systems are specifically designed for this. Other systems require a pump to maintain suitable flow. You’ll also need to consider:
- Whether the water butt holds enough water.
- Whether the tubing and emitters work at low pressure.
- Whether you need filtration to prevent blockages.
- Whether the system delivers water evenly.
- How the water supply will be managed during prolonged dry weather.
Collecting rainwater is a useful way to reduce reliance on mains water, particularly when your garden has several raised beds.
However, a water butt won’t necessarily provide enough water throughout a long, dry summer without additional storage.
How to Maintain Your Irrigation System
A little maintenance helps prevent frustrating problems.
Check for Leaks
Inspect connectors and tubing regularly. Even a small leak can waste a surprising amount of water when the system runs frequently.
Look for Blocked Emitters
If one part of the bed remains dry while the surrounding soil is moist, check for a blockage. Clean or replace emitters according to the manufacturer’s instructions.
Flush the Lines
Some systems have removable end fittings that allow you to flush out accumulated debris. Follow the manufacturer’s maintenance guidance.
Check the Timer
Make sure the timer is working correctly and hasn’t been left running longer than intended. Adjust the schedule after heavy rain or changes in the weather.
Inspect Soil Moisture
The most important maintenance task is checking the soil itself. Even a perfectly functioning irrigation system can deliver too much or too little water if the schedule is unsuitable.
Prepare for Winter
Before freezing weather arrives, disconnect and drain equipment as recommended by the manufacturer. Remove timers and other frost-sensitive components where required. This can help prevent damage and extend the life of your system.
Common Irrigation Problems and How to Fix Them
Some Squares Are Much Wetter Than Others
Check the position and output of the emitters. You may need to adjust the layout or use pressure-compensating emitters where suitable. Don’t simply add random holes to the tubing.
Water Runs Out of the Bed
The water may be arriving faster than the soil can absorb it. Reduce the flow, shorten the watering period or use a more suitable delivery method. Also check soil condition and drainage.
The Surface Is Wet, but the Soil Below Is Dry
The system may not be running long enough for water to reach the roots. Water more thoroughly, then allow the soil surface to dry appropriately before watering again.
Plants Are Wilting Despite Irrigation
Check soil moisture before assuming they need more water. Wilting can result from drought, waterlogged roots, heat stress or other growing problems. If the root zone is already wet, adding more water may make matters worse.
The Drippers Keep Blocking
Check filtration and water quality. Stored rainwater may contain debris that needs filtering. Flush and maintain the system according to the manufacturer’s instructions.
Frequently Asked Questions
Is drip irrigation worth it for a small square foot garden?
It can be, especially if you struggle to water regularly. However, a watering can may be simpler and cheaper for one small raised bed.
What’s better: drip irrigation or a seep hose?
Drip irrigation offers more control over individual watering points. Seep hoses can be convenient for closely spaced plants. The best choice depends on your bed layout and how much adjustment you need.
Do you need one dripper per square?
No. Square-foot grids are a planting system, not separate watering compartments. Plan irrigation around root zones and soil coverage rather than automatically installing one dripper in each square.
Should you water a raised bed every day?
Not necessarily. The frequency depends on the weather, crop, soil and moisture already present. Some newly planted seedlings and containers need frequent watering, while established plants may benefit from less frequent but more thorough watering.
Can drip irrigation run automatically?
Yes. Many systems can be connected to compatible timers. However, you still need to monitor soil moisture, rainfall and the equipment itself.
Can you water vegetables in the middle of the day?
Yes, when necessary. Watering in strong sunshine isn’t inherently dangerous, and the idea that droplets routinely scorch leaves is a myth. Early morning is generally more water-efficient for routine watering.
Can you use rainwater for drip irrigation?
Yes, with suitable equipment. A gravity-fed water butt may require specially designed low-pressure components, while other systems need a pump.
Do you need special equipment for a UK outdoor tap?
You need appropriate backflow protection, and permanent automatic systems may require additional safeguards. Check the requirements with your water supplier or a qualified professional before installing a permanent mains-fed system.
Is Irrigation Worth Adding to Your Square Foot Garden?
If you have several raised beds or struggle to keep up with watering during summer, a simple irrigation system can make a real difference to the amount of work involved.
Drip lines and seep hoses are particularly useful because they deliver water around the roots without requiring you to reach beneath mature foliage with a watering can.
But you don’t need an expensive smart system to grow a successful square foot garden. Sometimes a basic seep hose, a suitable watering can and a good layer of mulch are more than enough.
The important thing is understanding how much moisture your vegetables need and finding a reliable way to provide it.
Start with one bed, experiment with a simple layout and check how the water moves through your soil before expanding the system.
A good irrigation setup doesn’t just make watering easier. It helps you look after your vegetables without wasting water or creating more work than necessary.
A Note About Our Gardening Advice
Gardening Is Great is based in the UK, so our growing guides and seasonal advice are written with British gardens and growing conditions in mind. However, much of our advice is also useful to gardeners in other temperate climates, including parts of Europe, North America and beyond. Just remember that planting times, frost dates and growing seasons vary depending on where you live. Always adjust seasonal recommendations to suit your local climate and growing conditions.
Save This Gardening Guide for Later
Planning your garden? Save one of these pins to your favourite gardening board so you can find this guide again.
For more tips on square foot gardening, take a look at these popular posts:
- Everything You Need To Know Before You Start Square Foot Gardening
- How To Use A Trellis In Your Square Foot Garden
- Companion Planting in a Square Foot Garden
